Exercise 2
|
In this exercise, you will add the Work Area field to the TTLEAV001 - Annual Leave Accrued Units(ii) report.
You are on the View Report Groups | Leave Reports window.
- Right-click TTLEAV001 - Annual Leave Accrued Units (ii); this is the copy of the PGPRLEAV001 report that you created in the last exercise.
- Select Edit Report Definition from the menu.
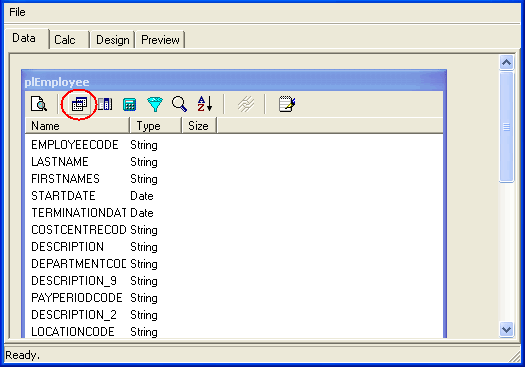
- Click the Data tab.
- Click the Table icon on the data pipeline.
Note: The data pipeline is a selection of tables from the database.

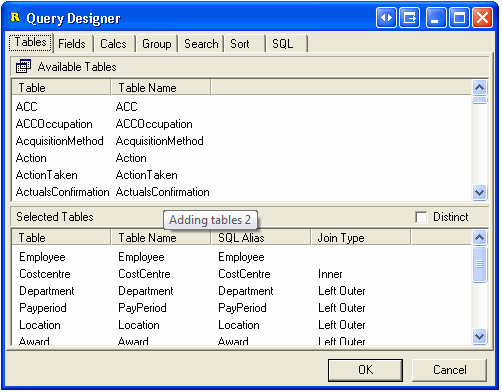
The Query Designer window appears. You will use this window to add the Workarea table to the report.

Note: Tables that have been added to the data pipeline are displayed in the Selected Tables section. Always check that the table you require is not already present in Selected Tables.
- Scroll down the list of tables in the Available Tables section until you can see the WorkArea table.
- Double-click the WorkArea table.
Alternatively, you can drag and drop the WorkArea table from the Available Tables section to the Selected Tables section.
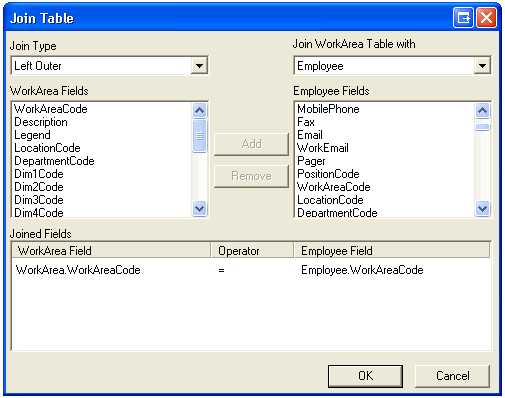
The Join Table window appears:
- In the Join Type drop-down list, click Left Outer.
- In the Join WorkArea Table with drop-down list, click the Employee table.
- In the WorkArea Fields section, click WorkAreaCode.
- In the Employee Fields section, click WorkAreaCode.
You have selected two fields to join by, so the Add button is now active.
- Click Add.
The join is created in the Joined Fields section.

Refer to the following table for more information about the Join Table settings.
|
|
Section / Button
|
Details
|
Join Type
|
The format that the tables will be joined together. You should use either "Inner" or "Left Outer" joins.
An Inner Join will only return rows where there is a direct link between the two tables. For example, if you join the Dim1 table to the Employee table and run the report, it will only return results for the employees who have the Dim1 field populated in their employee record.
A Left Outer Join will return all rows from the primary table whether or not there is a corresponding value in the secondary table. In the above example the report would return all employees whether or not they had the Dim1 field populated in their employee record.
|
Join x Table with
|
Select the table that you want to join to. PayGlobal defaults to the last table that was joined to the report.
|
x Fields (Left side)
|
The list of fields in the new table. Select the field that you want to use as a primary field to join by.
|
y Fields (Right side)
|
The list of fields in the table that you want to join your new table to. Match the field from the list with your selection from the new table on the left.
|
Note: Only use fields that will correspond directly between the two tables. For example, never use the Notes and the Description fields to join tables together, as they will most certainly be different.
|
Joined Fields
|
Displays the fields that have been joined. By default joins are created between all the common fields in the new table and the last table joined to the report.
|
Add button
|
This button is active when you select two fields to act as a join. Click the Add button to add the join to the Joined Fields area below.
|
Remove button
|
If there are joins in the Joined Fields area that you do not want, then select the join and click the Remove button. To select multiple joins, hold the Shift key down and click a range of joins.
|
Click OK.
You are returned to the Query Designer window. The new table is now listed in the Selected Tables section.
- Click the Fields tab.
Use this tab page to add fields that you require. The selected fields for each table on the Tables tab are displayed in the Selected Fields section.
To add a field to the Selected Fields section, double-click the field in the Available Fields section. Alternatively, you can drag and drop the field from Available Fields to Selected Fields.
- Click OK to save your changes to the data pipeline.
- Close the PayGlobal Reporting Engine window.
A Confirm message appears:
Do you want to save these changes as report "[path]\[report.RTM]"
- Click Yes.
|